Building a successful industrial-grade laboratory from scratch is a multidisciplinary endeavor that integrates knowledge of chemistry, physics, microbiology, biosafety, and other fields. It also involves complex systems engineering, including ventilation, waste gas and liquid treatment, and gas supply. At the same time, environmental protection, safety, and sustainable development are all essential.
1. Structure: The Soul of the Laboratory—Positioning and Planning
Everything begins with precise “structure”—laboratory positioning and planning. This is the foundation and soul of the entire project.
- Laboratory Positioning: Clarifying the direction is crucial. Consider the following: What level of standards should the laboratory achieve internationally and domestically? What role will it play within the industry or system? Will it perform government functions or operate as a third-party testing institution? How should it be positioned within its geographical region?
- Laboratory Planning: This encompasses two core elements:
- Architectural Planning: Determines the building’s appearance, style, height, and overall layout of the campus.
- Process Planning: Focuses on meeting the functional requirements of experimental processes.
- Thorough Research First: Before construction begins, extensive and in-depth research on requirements must be conducted. It is essential to clearly understand current needs and future development directions, as well as thoroughly examine existing laboratories of the same type to learn from valuable experiences and lessons.
- Paradigm Shift: It is crucial to recognize that professional laboratory construction is a systematic engineering project aimed at creating a working environment and work methods, not merely a simple assembly of instruments and lab furniture.
2. General-Purpose Laboratories: Flexibility and Standardization
General-purpose laboratories are the core work areas, and their design must balance flexibility with standardization requirements.
- Standard Units: These form the foundation of the design. The span (width) is determined by the width of the laboratory benches, their layout, and spacing, and should not be less than 6 meters. The depth (length) is determined by the length of the laboratory benches, fume hoods, and equipment layout, and should not be less than 6.6 meters; when there are no fume hoods, it should not be less than 5.7 meters.
- Key Dimensions for Space Layout:
- 1/2 Unit Laboratory: The clear distance between the two side benches should be ≥1.6 meters. When one side is modified to accommodate a fume hood/equipment, the clear distance from the other side bench should be ≥1.5 meters.
- Single-unit laboratory: The clear distance between the side benches and the central island/peninsula benches should be ≥1.6 meters. When a fume hood or equipment is installed on the wall or in the center, the clear distance from the laboratory bench should be ≥1.5 meters. The end of the island bench should be ≥6.6 meters from the outer wall.
- Side wall doors: If a door on the side wall adjacent to the outer wall leads to another space, the corresponding clear distance should be increased by 0.1 meters.
- Continuous island benches: The end of the bench must be at least 1 meter from the exterior wall.
- Relationship with windows: Central island/peninsula benches should not be parallel to exterior windows. If parallel alignment is necessary, the clear distance from the exterior wall must be at least 1.3 meters. Side benches should not be placed adjacent to exterior walls with windows, especially those requiring shared utility supply.
- Corridors and doorways: The end of edge benches should be at least 1.2 meters from corridor walls. The end of central benches should be at least 1.2 meters from corridor walls. When indoor recessed doorways are provided, the end of laboratory benches should be at least 1.2 meters from the doorway wall. When the operating surface of a fume hood is opposite the end of a laboratory bench, the clear distance should be at least 1.2 meters.
- Layout principles: General-purpose laboratories should be composed of one or more standard units. It is recommended to arrange them along the exterior walls of the building. For laboratories requiring air conditioning, north-facing orientations should be prioritized.
3. Specialized Laboratories: Meeting Specific Requirements
Specialized laboratories are designed to serve specific experiments or equipment and require customized design.
- Space Dimensions: The width and depth should be strictly determined based on equipment dimensions, installation, and maintenance requirements.
- Fume Hoods and Laboratory Benches: Arrangement must comply with the relevant spacing regulations for general-purpose laboratories.
- Environmental Control: For laboratories with special requirements such as temperature and humidity control, the building design must incorporate targeted technical measures (e.g., insulation, precision air conditioning, etc.).
4. Key Design Considerations for Critical Function Rooms
- Biological Culture Room (Sterile Core Zone):
- Composition: Must include an antechamber, preparation room, biological culture room, and instrument sterilization and cleaning room. The antechamber must have an area of ≥8㎡ and be equipped with separate lockers for storing personal clothing and work attire, as well as shoe cabinets. Multiple culture rooms may share a centralized changing area at the entrance.
- Contamination Prevention: Strictly prevent cross-infection between personnel flows. Preferably located at the end of the building. Avoid exterior windows whenever possible. If windows are necessary, they must be double-layered, airtight windows with light-blocking blinds.
- Partitioning: Separated from non-culture zones by solid brick walls. Internal functional rooms are recommended to be partitioned by sealed glass partition walls, with frames that are easy to clean and resistant to deformation. Doors should preferably be sliding doors.
- Sterilizer: Reserve a placement location.
- Balance Room (Precision First):
- Anteroom: Mandatory, with an area of ≥6㎡, which can also serve as a changing and shoe-changing area. Preferably north-facing, with double-layered sealed windows and curtains.
- Partitioning: Separated from the antechamber using sealed glass partitions and sliding doors.
- Seismic protection: The balance platform surface and base must be vibration-isolated. When installed along walls, they must be separated from the walls. The surface must be flat, smooth, and highly rigid; wooden platforms are prohibited. The base of upper-floor balance platforms should be adjacent to load-bearing walls/columns.
- High-precision balance room: In addition to meeting the above requirements, it must be located on the north side of the ground floor of the laboratory building. The platform must have an independent base (to avoid basement floors). Double-layered sealed windows.
- Electron Microscope Room (Vibration-proof and Magnetic-proof):
- Location: Strictly comply with the equipment’s permissible vibration speed and magnetic-proof requirements, and keep away from vibration sources and magnetic fields. The ground floor of the building is the preferred location.
- Composition: Electron microscope room, transition room (≥6㎡, with locker and shoe cabinets), preparation room, sectioning room, coating room, darkroom.
- Electron Microscope Room: No external windows should be installed. Clear height should be determined based on equipment and maintenance requirements. The base must be vibration-isolated.
- Air: Air in the electron microscope room, sectioning room, and coating room must be filtered.
- Personnel Management: Entrances and exits must be equipped with lockers and shoe cabinets.
- Spectrometer Analysis Room (Away from Vibration):
- Location: Away from vibration sources, preferably on the ground floor. If located on upper floors, strong vibration isolation measures must be implemented.
- Composition: Spectrometer room, transition room (≥6㎡, with locker and shoe cabinets), sample preparation room, chemical processing room, darkroom, data processing room, and workroom.
- Ventilation: Install fume hoods as needed. Install exhaust hoods in the light source area. Avoid installing sinks inside the spectrometer room.
- Research Workrooms: Number determined as needed, with a minimum per-person floor area of ≥6㎡. Location should be adjacent to or integrated with the laboratory.
- Academic Activity Room: Area to be determined based on needs. Should be connected to public transportation spaces and include seating/sofa areas.
- Small ≥ 40 m², medium ≥ 60 m².
- Per capita area: ≥ 1.8 m² with meeting tables; ≥ 0.8 m² without meeting tables.
- Academic Lecture Hall: Size determined as needed, equipped with a podium, whiteboard, and projection screen, with space reserved for projection equipment. For over 180 people, a stepped floor is recommended (to ensure unobstructed views). Fixed seating and writing desks should be provided: seating with desks should have a row spacing of ≥0.95m; independent desks should have a row spacing of ≥1m.
- Library and Materials Room: Includes book storage, cataloging, reading, and circulation areas. The location should be quiet and convenient for accessing the laboratory area. Open-shelf reading is recommended.
5. Public Facilities and Piping: The Lifeline of the Laboratory
- Public utility rooms (power core): These include refrigeration rooms, air conditioning rooms, exhaust fan rooms, water supply and drainage rooms, water treatment rooms, transformer rooms, telecommunications rooms, and gas supply rooms. They should be located close to the corresponding load centers. When located in basements, proper moisture-proofing, waterproofing, and ventilation measures must be implemented.
- Piping Spaces (Hidden Vessels): Includes piping shafts, piping corridors, and piping technical layers.
- Selection Criteria: Dimensions and locations are determined by building standard unit combinations, public facility system design, and installation/maintenance requirements.
- Piping Shafts: Preferred when piping is minimal. Centralized with maintenance doors; decentralized with maintenance access points at valve locations when centralized is impractical.
- Pipe corridors/technical layers: Used when there are many pipes and pipe shafts cannot meet requirements; maintenance doors must be provided.
6. Selection and Layout of Core Laboratory Equipment
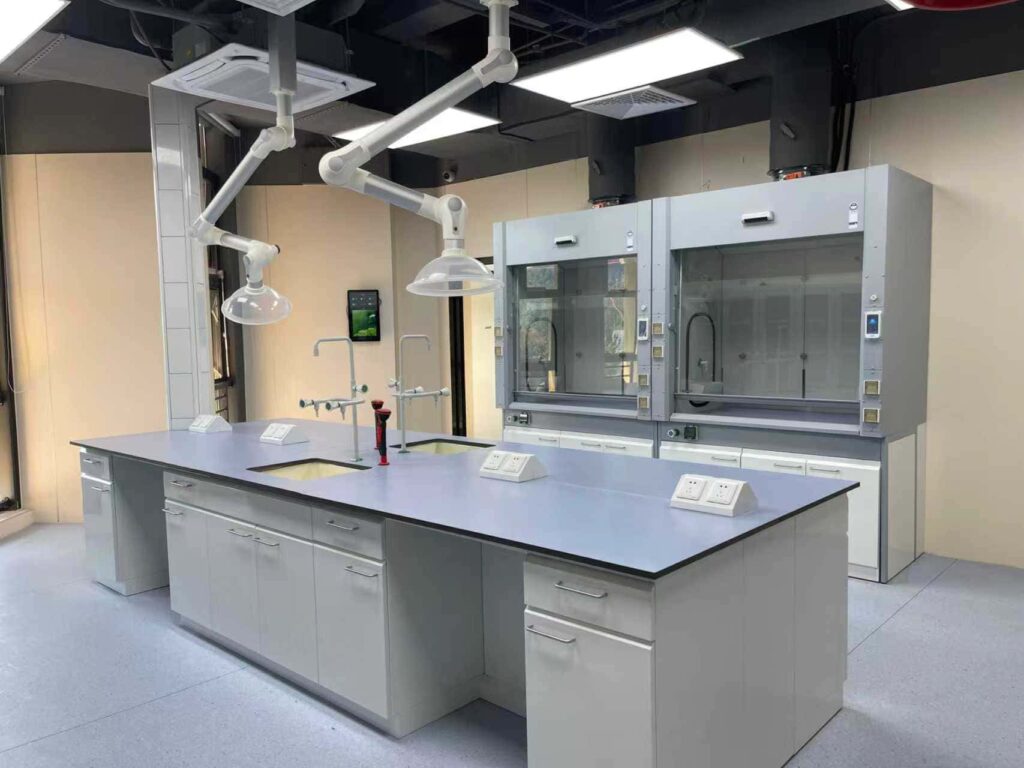
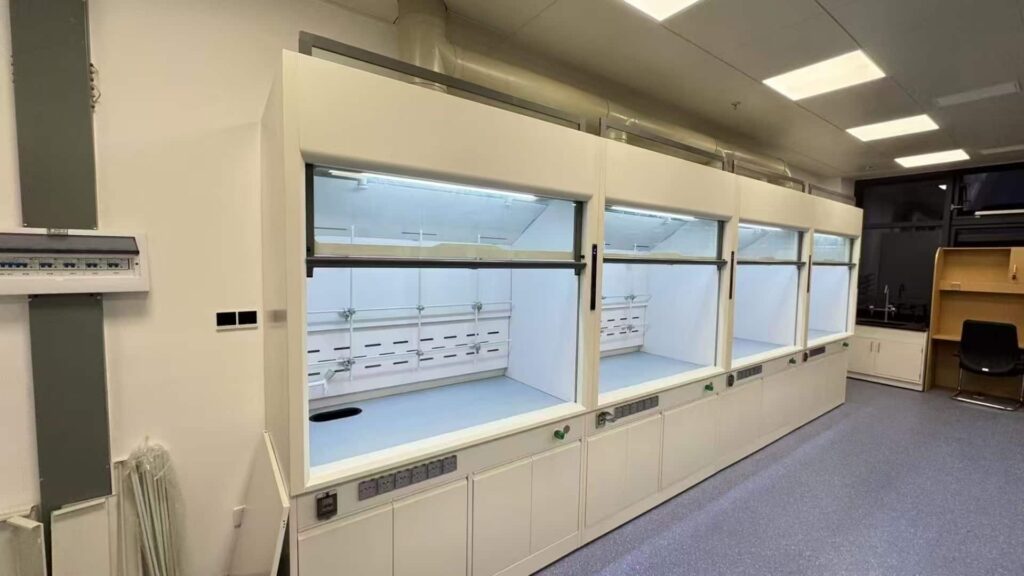
- Fume Hood (Safety Guardian):
- Selection: Prefer standard energy-efficient models (especially for air-conditioned laboratories). The inner lining and work surface must be corrosion-resistant, fire-resistant, high-temperature resistant, and waterproof. Use a tray-type work surface + cup-type drain tray. The outer shell must be corrosion-resistant, fire-resistant, and waterproof.
- Piping:** Internal utility piping should be concealed. Faucet fittings protruding from the cabinet must be corrosion-resistant and fire-resistant. Valves, outlets, and switches should be located outside the cabinet in easily accessible areas.
- Safety:** Glass components such as cabinet doors and windows must use transparent safety glass.
- Layout Golden Rules:
- Closely integrate with standard building unit design.
- Adjacent to or near pipe shafts/corridors.
- Avoid main pedestrian traffic and entrances/exits.
- Non-air-conditioned laboratories: Away from exterior windows.
- Air-conditioned laboratories: Away from indoor air supply vents. If conflicting, adjust the position of the air supply vents.
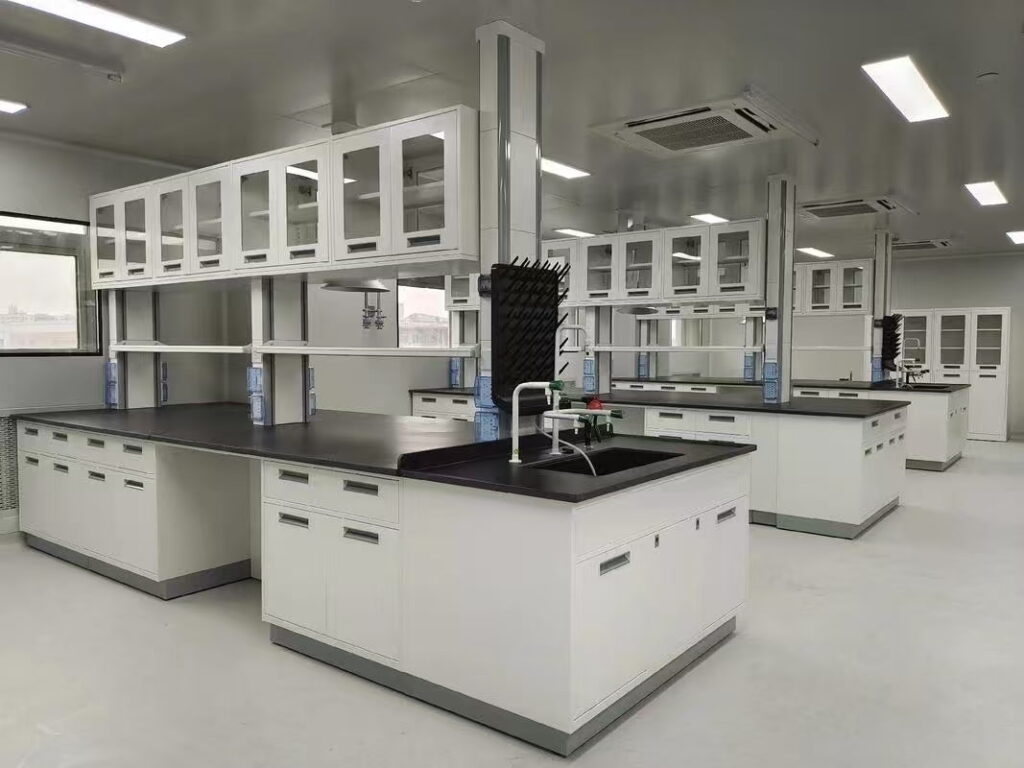
- Laboratory Benches (Workstations):
- Central Laboratory Benches: Suitable for island-style layout in the center of the space, with ample walkways around for mobility and emergency access. Peninsula-style layout can be used when there are exits on both sides/ends of the laboratory.
- Side Laboratory Benches: Arranged along the walls, with pedestrian walkways in the middle. Recessed design enhances comfort and expands activity space.
- General Principles: Regardless of whether it is a central bench, side bench, or other equipment, ensure that exits are unobstructed and indoor movement is convenient. Divide the space scientifically based on the functions of the central bench and the locations of major fixed equipment.
- Storage Cabinets (Racks) (Efficient Storage):
- It is recommended to install built-in or wall-mounted cabinets (racks) on the interior walls of the laboratory.
- The bottom of the cabinet (rack) must be at least 1.2 meters above the ground.
- The cabinet must be sufficiently load-bearing and securely connected to the wall.
- Horizontal shelves should be adjustable up and down.
7. Safety Protection and Environmental Protection Design
- The emergency ventilation system (EV) achieves ≥ 10 air changes per hour, with the AHU operating at 100% fresh air.
- The eyewash station provides a water flow rate of ≥ 11.4 L/min, sustained for ≥ 15 minutes.
- Equipped with fire extinguishers, fire blankets, and fire sand buckets.
- Chemical waste liquids and gases must be collected and treated separately in accordance with national emission standards.
8. Nergy Efficiency, Flexibility, and Information Technology
- Laboratories should adopt a modular design to enhance spatial flexibility and scalability.
- Equipped with an intelligent safety warning system and a laboratory information management system (LIMS).
- Utilize energy-efficient fume hoods, adjustable lighting, heat recovery systems, and automatic valve control.

9. Summary: Systemic Thinking is Key
Building a successful professional laboratory from scratch is a complex challenge that combines science, engineering, and management. By prioritizing safety, efficiency, environmental protection, and future development space, it is possible to create a modern laboratory environment that truly supports scientific research and innovation. cross-infection between personnel flows.